Unique Email – Kotlin -Code Challenge

Problem

Every valid email consists of a local name and a domain name, separated by the '@' sign. Besides lowercase letters, the email may contain one or more '.' or '+'.

  • For example, in "alice@leetcode.com""alice" is the local name, and "leetcode.com" is the domain name.

If you add periods '.' between some characters in the local name part of an email address, mail sent there will be forwarded to the same address without dots in the local name. Note that this rule does not apply to domain names.

  • For example, "alice.z@leetcode.com" and "alicez@leetcode.com" forward to the same email address.

If you add a plus '+' in the local name, everything after the first plus sign will be ignored. This allows certain emails to be filtered. Note that this rule does not apply to domain names.

  • For example, "m.y+name@email.com" will be forwarded to "my@email.com".

It is possible to use both of these rules at the same time.

Given an array of strings where we send one email to each email[i], return the number of different addresses that actually receive mails.

Example 1:

Input: emails = ["test.email+alex@leetcode.com","test.e.mail+bob.cathy@leetcode.com","testemail+david@lee.tcode.com"]
Output: 2
Explanation: "testemail@leetcode.com" and "testemail@lee.tcode.com" actually receive mails.

Example 2:

Input: emails = ["a@leetcode.com","b@leetcode.com","c@leetcode.com"]
Output: 3

Simple Kotlin Solution

fun main(args:Array<String>){

        var result = numUniqueEmails(arrayOf("test.email+alex@leetcode.com","test.email.leet+alex@code.com"))
        printResult("Unique Email Count ", result.toString())
}

fun numUniqueEmails(emails: Array<String>): Int {
    var list=ArrayList<String>()

    for (email in emails){
        var localname=email.split("@")[0].split("+")[0].replace(".","")
        var domain=email.split("@")[1]
        if(!list.contains("$localname@$domain")){
            list.add("$localname@$domain")
        }
    }
    return list.size
}

Plus One – Code Challenge-Kotlin

Problem

You are given a large integer represented as integer array digits, where each digits[i] is the ith digit of the integer. The digits are ordered from most significant to least significant in left-to-right order. The large integer does not contain any leading 0’s.

Increment the large integer by one and return the resulting array of digits.

Example

Example 1:
Input: digits = [1,2,3]
Output: [1,2,4]
Explanation: The array represents the integer 123.
Incrementing by one gives 123 + 1 = 124.
Thus, the result should be [1,2,4].

Example 2:
Input: digits = [4,3,2,1]
Output: [4,3,2,2]
Explanation: The array represents the integer 4321.
Incrementing by one gives 4321 + 1 = 4322.
Thus, the result should be [4,3,2,2].

Example 3:
Input: digits = [0]
Output: [1]
Explanation: The array represents the integer 0.
Incrementing by one gives 0 + 1 = 1.
Thus, the result should be [1].

Example 4:
Input: digits = [9]
Output: [1,0]
Explanation: The array represents the integer 9.
Incrementing by one gives 9 + 1 = 10.
Thus, the result should be [1,0].

Solution- Kotlin

fun main(args:Array<String>){

    var result= plusOne(intArrayOf(3,2,3,9),)
        printResult("Plus One",result.contentToString())
}

fun plusOne(digits: IntArray): IntArray {
    var carry=1
    for (i in digits.size-1 downTo 0){
       digits[i]+=carry
        carry=digits[i]/10
        if(carry==0){
            break
        }
        digits[i]=digits[i]%10
    }
    if (carry==1){
        var result=IntArray(digits.size+1)
        result[0]=carry
        return result
    }
    return digits
}

Valid Parentheses – Code Challenge- Kotlin

Problem

Given a sorted array of distinct integers and a target value, return the index if the target is found. If not, return the index where it would be if it were inserted in order.

Given a string s containing just the characters ‘(‘, ‘)’, ‘{‘, ‘}’, ‘[‘ and ‘]’, determine if the input string is valid.

An input string is valid if:

Open brackets must be closed by the same type of brackets.
Open brackets must be closed in the correct order.

Example

Example 1:
Input: s = "()"
Output: true

Example 2:
Input: s = "()[]{}"
Output: true

Example 3:
Input: s = "(]"
Output: false

Example 4:
Input: s = "([)]"
Output: false

Example 5:
Input: s = "{[]}"
Output: true

Solution- Kotlin

fun main(args:Array<String>){

    var result= isValid("{[]}")
    printResult("Remove Element ",result.toString())
}

fun isValid(s: String): Boolean {

    var stack=Stack<String>()
    s.forEach {
        when(it.toString()){
            "{"->stack.push("}")

            "("->stack.push(")")
            "["->stack.push("]")
            else-> {
                if(stack.isEmpty()||stack.pop()!=it.toString()){
                    return false
                }
            }
        }

    }

    return stack.isEmpty()
}

Search Insert Position -Binary Search Kotlin

Problem

Given a sorted array of distinct integers and a target value, return the index if the target is found. If not, return the index where it would be if it were inserted in order.

You must write an algorithm with O(log n) runtime complexity.

Example

Example 1:
Input: nums = [1,3,5,6], target = 5
Output: 2

Example 2:
Input: nums = [1,3,5,6], target = 2
Output: 1

Example 3:
Input: nums = [1,3,5,6], target = 7
Output: 4

Example 4:
Input: nums = [1,3,5,6], target = 0
Output: 0

Example 5:
Input: nums = [1], target = 0
Output: 0

Solution- Kotlin

fun main(args:Array<String>){

    var result= searchInsert(intArrayOf(1,3,5,6),5)
        printResult("searchInsert",result.toString())
}

//Binary Search
fun searchInsert(nums: IntArray, target: Int): Int {
    var start=0
    var end=nums.size-1

    while (start<=end){
        var mid=(start+end)/2
        if (nums[mid]>target){
            end=mid-1
        }else if(nums[mid]<target){
            start=mid+1
        }else{
            return mid
        }
    }
    return start
}

Camera Intent with Kotlin-Android

We know that in many situations our app needs to use the Camera of the device to take pictures, You might know how to use Camera feature in your Android app with Java which is a traditional language for Android .

Here we are going to learn how to use Camera feature in our App with Kotlin.

Add permissions

Make sure that you have added the following permissions into your manifest.xml file.

<uses-permission android:name=”android.permission.CAMERA”/>
<uses-permission android:name=”android.permission.WRITE_EXTERNAL_STORAGE”/>
<uses-permission android:name=”android.permission.READ_EXTERNAL_STORAGE”/>

Set up Layout

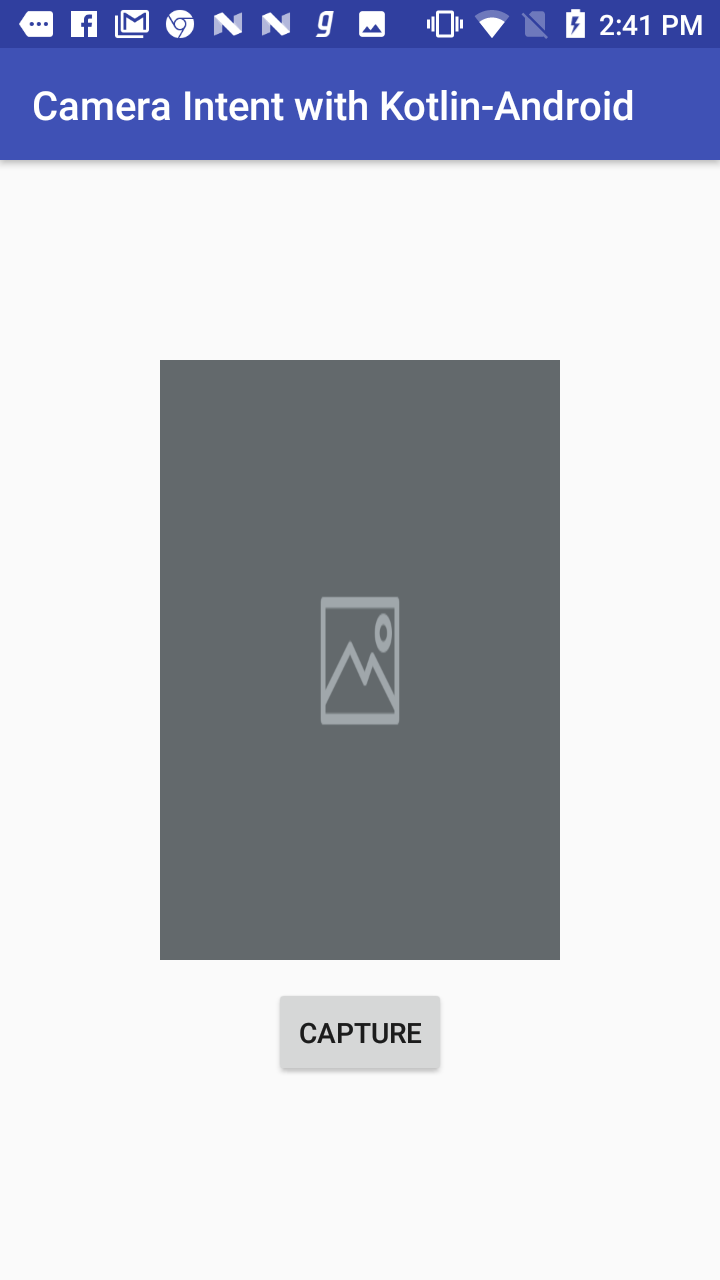
We are going to setup Layout file for MainActivity Our layout consists of an ImageView and a Capture Button as given below.

<?xml version="1.0" encoding="utf-8"?>
<RelativeLayout
    xmlns:android="http://schemas.android.com/apk/res/android"
    xmlns:tools="http://schemas.android.com/tools"
    xmlns:app="http://schemas.android.com/apk/res-auto"
    android:layout_width="match_parent"
    android:layout_height="match_parent"
    tools:context=".MainActivity">

   <LinearLayout
       android:layout_centerInParent="true"
       android:orientation="vertical"
       android:layout_width="match_parent"
       android:layout_height="wrap_content">

       <ImageView
           android:id="@+id/image_view"
           android:background="@drawable/img_placehlder"
           android:layout_gravity="center_horizontal"
           android:layout_width="200dp"
           android:layout_height="300dp" />
       <Button
           android:id="@+id/btn_capture"
           android:text="Capture"
           android:layout_marginTop="12dp"
           android:layout_gravity="center_horizontal"
           android:layout_width="wrap_content"
           android:layout_height="wrap_content" />

   </LinearLayout>

</RelativeLayout>

The layout will be like this.

Set Up MainActivity

Now we are going to set up our MainActivity.kt, Have the following methods.

Firstly we need to handle the permissions, From Android 6.0 (Marshmellow) Google introduced Run time permissions. We need to declare the permissions in the manifest.xml file and then request these permissions in runtime so that user can approve or decline each permission.  Add the following code to check permissions and request permission

    
    private fun checkPersmission(): Boolean {
        return (ContextCompat.checkSelfPermission(this, android.Manifest.permission.CAMERA) ==
                PackageManager.PERMISSION_GRANTED && ContextCompat.checkSelfPermission(this,
                android.Manifest.permission.READ_EXTERNAL_STORAGE) == PackageManager.PERMISSION_GRANTED)
    }

    private fun requestPermission() {
        ActivityCompat.requestPermissions(this, arrayOf(READ_EXTERNAL_STORAGE, CAMERA),
        PERMISSION_REQUEST_CODE)
    }
    

We are going to check this permission in Capture Button click. So if the user is already given the permissions to access Camera and External Storage we can directly open the Camera to take Picture. But we should manage the onRequestPermissionsresult() to open the camera after the request for permissions and if the user accepted it. This includes a method takePicture() which is defined later. The code is given below

   
   override fun onRequestPermissionsResult(requestCode: Int, permissions: Array<out String>, grantResults: IntArray) {
        when (requestCode) {
            PERMISSION_REQUEST_CODE -> {

                if ((grantResults.isNotEmpty() && grantResults[0] == PackageManager.PERMISSION_GRANTED)
                        &&grantResults[1] == PackageManager.PERMISSION_GRANTED) {

                    takePicture()

                } else {
                  Toast.makeText(this,"Permission Denied",Toast.LENGTH_SHORT).show()
                }
                return
            }

            else -> {

            }
        }
    }
    

Now let’s take a look at takePicture() method. In this method, we set up an Intent to open the Camera. This method consists of a method called createFile() used to create a File to store the Image.

@Throws(IOException::class)
    private fun createFile(): File {
        // Create an image file name
        val timeStamp: String = SimpleDateFormat("yyyyMMdd_HHmmss").format(Date())
        val storageDir: File = getExternalFilesDir(Environment.DIRECTORY_PICTURES)
        return File.createTempFile(
                "JPEG_${timeStamp}_", /* prefix */
                ".jpg", /* suffix */
                storageDir /* directory */
        ).apply {
            // Save a file: path for use with ACTION_VIEW intents
            mCurrentPhotoPath = absolutePath
        }
    }

We need to Configure the FileProvider in our app’s manifest.xml file to add a provider to our application.

<application>
   ... 
<provider
            android:name="android.support.v4.content.FileProvider"
            android:authorities="com.example.android.fileprovider"
            android:exported="false"
            android:grantUriPermissions="true">
            <meta-data
                android:name="android.support.FILE_PROVIDER_PATHS"
                android:resource="@xml/file_path">
                
            </meta-data>
        </provider>
    ...
</application>

Create a new file file_path.xml under  res/xml folder.  Make sure you have added your package name in the path instead of “com.kotlincodes.cameraintentwithkotlin_android”

<?xml version="1.0" encoding="utf-8"?>
<paths xmlns:android="http://schemas.android.com/apk/res/android">
    <external-path name="my_images"
        path="Android/data/com.kotlincodes.cameraintentwithkotlin_android/files/Pictures" />
</paths>

Now we can set an Intent to start Camera to capture an Image as follows

 
 private fun takePicture() {

        val intent: Intent = Intent(MediaStore.ACTION_IMAGE_CAPTURE)
        val file: File = createFile()

        val uri: Uri = FileProvider.getUriForFile(
                this,
                "com.example.android.fileprovider",
                file
        )
        intent.putExtra(MediaStore.EXTRA_OUTPUT,uri)
        startActivityForResult(intent, REQUEST_IMAGE_CAPTURE)

    }
    

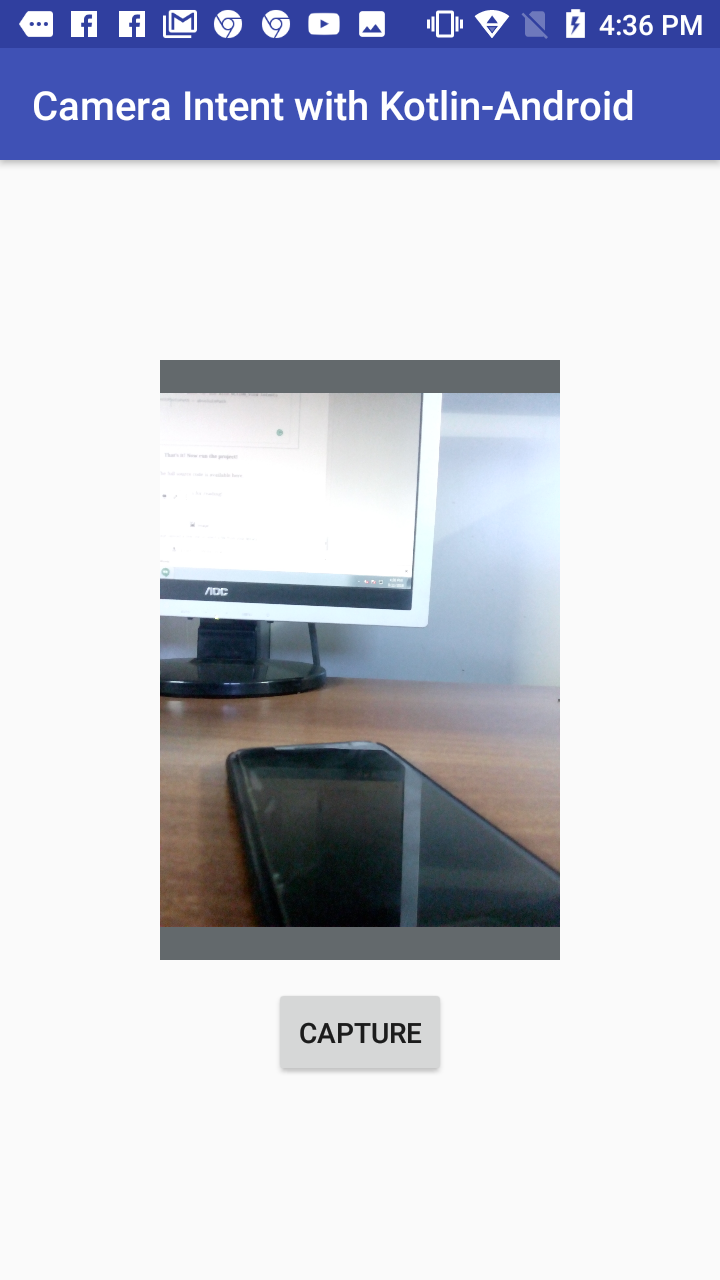
This method will open the Camera and we can capture an Image. After taking a Picture we need to show this Image on our ImageView. To set the ImageView add the following code

 
 override fun onActivityResult(requestCode: Int, resultCode: Int, data: Intent?) {
        if (requestCode == REQUEST_IMAGE_CAPTURE && resultCode == Activity.RESULT_OK) {

            //To get the File for further usage
            val auxFile = File(mCurrentPhotoPath)


           var bitmap :Bitmap=BitmapFactory.decodeFile(mCurrentPhotoPath)
            imageView.setImageBitmap(bitmap)

        }
    }

Now we are all set to run the project. Please find the Complete code for MainActivity.kt file below.

MainActivity.kt

package com.kotlincodes.cameraintentwithkotlin_android

import android.Manifest.permission.CAMERA
import android.Manifest.permission.READ_EXTERNAL_STORAGE
import android.app.Activity
import android.content.Intent
import android.content.pm.PackageManager
import android.graphics.Bitmap
import android.graphics.BitmapFactory
import android.net.Uri
import android.os.Bundle
import android.os.Environment
import android.provider.MediaStore
import android.support.v4.app.ActivityCompat
import android.support.v4.content.ContextCompat
import android.support.v4.content.FileProvider
import android.support.v7.app.AppCompatActivity
import android.view.View
import android.widget.Button
import android.widget.ImageView
import android.widget.Toast
import java.io.File
import java.io.IOException
import java.text.SimpleDateFormat
import java.util.*


class MainActivity : AppCompatActivity() {
    lateinit var imageView: ImageView
    lateinit var captureButton: Button

    val REQUEST_IMAGE_CAPTURE = 1


    private val PERMISSION_REQUEST_CODE: Int = 101

    private var mCurrentPhotoPath: String? = null;
    override fun onCreate(savedInstanceState: Bundle?) {
        super.onCreate(savedInstanceState)
        setContentView(R.layout.activity_main)

        imageView = findViewById(R.id.image_view)
        captureButton = findViewById(R.id.btn_capture)
        captureButton.setOnClickListener(View.OnClickListener {
            if (checkPersmission()) takePicture() else requestPermission()
        })


    }


    override fun onRequestPermissionsResult(requestCode: Int, permissions: Array<out String>, grantResults: IntArray) {
        when (requestCode) {
            PERMISSION_REQUEST_CODE -> {

                if ((grantResults.isNotEmpty() && grantResults[0] == PackageManager.PERMISSION_GRANTED)
                        && grantResults[1] == PackageManager.PERMISSION_GRANTED) {

                    takePicture()

                } else {
                    Toast.makeText(this, "Permission Denied", Toast.LENGTH_SHORT).show()
                }
                return
            }

            else -> {

            }
        }
    }

    private fun takePicture() {

        val intent: Intent = Intent(MediaStore.ACTION_IMAGE_CAPTURE)
        val file: File = createFile()

        val uri: Uri = FileProvider.getUriForFile(
                this,
                "com.example.android.fileprovider",
                file
        )
        intent.putExtra(MediaStore.EXTRA_OUTPUT, uri)
        startActivityForResult(intent, REQUEST_IMAGE_CAPTURE)

    }

    override fun onActivityResult(requestCode: Int, resultCode: Int, data: Intent?) {
        if (requestCode == REQUEST_IMAGE_CAPTURE && resultCode == Activity.RESULT_OK) {

            //To get the File for further usage
            val auxFile = File(mCurrentPhotoPath)


            var bitmap: Bitmap = BitmapFactory.decodeFile(mCurrentPhotoPath)
            imageView.setImageBitmap(bitmap)

        }
    }

    private fun checkPersmission(): Boolean {
        return (ContextCompat.checkSelfPermission(this, android.Manifest.permission.CAMERA) ==
                PackageManager.PERMISSION_GRANTED && ContextCompat.checkSelfPermission(this,
                android.Manifest.permission.READ_EXTERNAL_STORAGE) == PackageManager.PERMISSION_GRANTED)
    }

    private fun requestPermission() {
        ActivityCompat.requestPermissions(this, arrayOf(READ_EXTERNAL_STORAGE, CAMERA), PERMISSION_REQUEST_CODE)
    }

    @Throws(IOException::class)
    private fun createFile(): File {
        // Create an image file name
        val timeStamp: String = SimpleDateFormat("yyyyMMdd_HHmmss").format(Date())
        val storageDir: File = getExternalFilesDir(Environment.DIRECTORY_PICTURES)
        return File.createTempFile(
                "JPEG_${timeStamp}_", /* prefix */
                ".jpg", /* suffix */
                storageDir /* directory */
        ).apply {
            // Save a file: path for use with ACTION_VIEW intents
            mCurrentPhotoPath = absolutePath
        }
    }
}

That’s it! Now run the project!

The full source code is available here.

Thanks for reading!


ViewPager In Kotlin Android

Here we provides a simple tutorials to implement ViewPager in Kotlin.

ViewPager is one of most popular widgets available in android libraries. It is used in most of the famous apps like PlayStore,WhatsApp etc.

ViewPager is a widget that is used to implement tabs in Android Applications. ViewPager allows users to swipe left or right to see new screens.

Setup Layout file

This step is to add ViewPager in your Layout file. Go to your xml file and add the following code into it.

Make sure you have added the following dependency in your build.gradle file

implementation ‘com.android.support:design:27.1.1’

activity_main.xml

<?xml version="1.0" encoding="utf-8"?>
<LinearLayout xmlns:android="http://schemas.android.com/apk/res/android"
    xmlns:app="http://schemas.android.com/apk/res-auto"
    xmlns:tools="http://schemas.android.com/tools"
    android:layout_width="match_parent"
    android:layout_height="match_parent"
    android:orientation="vertical">

    <android.support.design.widget.TabLayout
        android:id="@+id/tabs"
        android:layout_width="match_parent"
        android:layout_height="?attr/actionBarSize"
        app:tabGravity="fill"
        app:tabMode="fixed" />

    <View
        android:layout_width="match_parent"
        android:layout_height="1dp"
        android:background="#c6c4c4" />

    <android.support.v4.view.ViewPager
        android:id="@+id/viewpager"
        android:layout_width="match_parent"
        android:layout_height="match_parent" />

</LinearLayout>

Implementing The Activity

Now we will implement the MainActivity.kt. Please keep in mind.

  • MainActivity class have a Fragment and FragmentPagerAdapter to setup the view pager, this are defined bit later
  • FragmentPagerAdapter inherited from PagerAdapter
  • Function initViews()  initializes the views
  • Function setupViewPager()  setting up the ViewPager 

MainActivity.ktI

package kotlincodes.com.viewpagerkotlin.activity

import android.support.v7.app.AppCompatActivity
import android.os.Bundle
import android.support.design.widget.TabLayout
import android.support.v4.view.ViewPager
import kotlincodes.com.viewpagerkotlin.R
import kotlincodes.com.viewpagerkotlin.ViewPagerAdapter.MyFragmentPagerAdapter
import kotlincodes.com.viewpagerkotlin.fragments.MyFrament

class MainActivity : AppCompatActivity() {

    private lateinit var viewpager: ViewPager
    private lateinit var tabs: TabLayout

    override fun onCreate(savedInstanceState: Bundle?) {
        super.onCreate(savedInstanceState)
        setContentView(R.layout.activity_main)

        initViews()

        setupViewPager()
    }

    private fun initViews() {
        tabs = findViewById(R.id.tabs)
        viewpager = findViewById(R.id.viewpager)
    }

    private fun setupViewPager() {

        val adapter = MyFragmentPagerAdapter(getSupportFragmentManager())

        var firstFragmet: MyFrament = MyFrament.newInstance("First Fragment")
        var secondFragmet: MyFrament = MyFrament.newInstance("Second Fragment")
        var thirdFragmet: MyFrament = MyFrament.newInstance("Third Fragment")

        adapter.addFragment(firstFragmet, "ONE")
        adapter.addFragment(secondFragmet, "TWO")
        adapter.addFragment(thirdFragmet, "THREE")

        viewpager!!.adapter = adapter

        tabs!!.setupWithViewPager(viewpager)

    }
}

Implementing The PagerAdapter Class

Now that we have the MainActivity.kt covered, we need to define the FragmentPagerAdapter Class. We have a addFragment inside FragmentPagerAdapter to add the Fragments .

MyFragmentPagerAdapter.kt

package kotlincodes.com.viewpagerkotlin.ViewPagerAdapter

import android.support.v4.app.Fragment
import android.support.v4.app.FragmentManager
import java.nio.file.Files.size
import android.support.v4.app.FragmentPagerAdapter
import kotlincodes.com.viewpagerkotlin.fragments.MyFrament


class MyFragmentPagerAdapter(manager: FragmentManager) : FragmentPagerAdapter(manager) {
    private val mFragmentList: ArrayList<Fragment> = ArrayList()
    private val mFragmentTitleList: ArrayList<String> = ArrayList()

    override fun getItem(position: Int): Fragment {
        return mFragmentList.get(position)
    }

    override fun getCount(): Int {
        return mFragmentList.size
    }

    fun addFragment(fragment: Fragment, title: String) {
        mFragmentList.add(fragment)
        mFragmentTitleList.add(title)
    }

    override fun getPageTitle(position: Int): CharSequence? {
        return mFragmentTitleList.get(position)
    }
}

Setting Up The Fragment

We are almost finished now we need to setup the Fragmet class. First we need to set the fragment_home.xml layout

Layout have only a TextView to indicate the changes .

fragment_home.xml

<?xml version="1.0" encoding="utf-8"?>
<RelativeLayout
    xmlns:android="http://schemas.android.com/apk/res/android" android:layout_width="match_parent"
    android:layout_height="match_parent">

    <TextView
        android:padding="12dp"
        android:background="#000"
        android:id="@+id/text"
        android:layout_centerInParent="true"
        android:textSize="22dp"
        android:textAllCaps="true"
        android:text="Fragment ONE"
        android:textAlignment="center"
        android:textColor="#fff"
        android:layout_width="match_parent"
        android:layout_height="wrap_content" />

</RelativeLayout>

now we need to setup the Fragment class MyFragment.kt

package kotlincodes.com.viewpagerkotlin.fragments

import android.os.Bundle
import android.support.v4.app.Fragment
import android.view.LayoutInflater
import android.view.View
import android.view.ViewGroup
import android.support.v4.view.ViewPager
import android.support.v7.widget.LinearLayoutManager
import android.support.v7.widget.RecyclerView
import android.view.TextureView
import android.widget.TextView
import kotlincodes.com.viewpagerkotlin.R
import android.provider.AlarmClock.EXTRA_MESSAGE


class MyFrament : Fragment() {
    companion object {
        fun newInstance(message: String): MyFrament {

            val f = MyFrament()

            val bdl = Bundle(1)

            bdl.putString(EXTRA_MESSAGE, message)

            f.setArguments(bdl)

            return f

        }
    }


    override fun onActivityCreated(savedInstanceState: Bundle?) {
        super.onActivityCreated(savedInstanceState)

    }

    override fun onCreateView(inflater: LayoutInflater, container: ViewGroup?, savedInstanceState: Bundle?): View? {
        var view: View? = inflater.inflate(R.layout.fragment_home, container, false);

        val message = arguments!!.getString(EXTRA_MESSAGE)

        var textView: TextView = view!!.findViewById(R.id.text)
        textView!!.text = message

        return view
    }


}

That’s With the above we can simply implement a  ViewPager in Kotlin. you can also get a Source code of the project from GitHub


Country Code Picker with Kotlin

Country code pickers are used to search and select country code or international phone code in android. This example describes how to add a country code picker using Kotlin for Android application .

  • First we needed to add the following dependency into our applications app level build.gradle file.

implementation ‘com.hbb20:ccp:2.2.2’

  • Add the following code into your activity_main.xml file 
<?xml version="1.0" encoding="utf-8"?>
<RelativeLayout xmlns:android="http://schemas.android.com/apk/res/android"
    xmlns:app="http://schemas.android.com/apk/res-auto"
    xmlns:tools="http://schemas.android.com/tools"
    android:layout_width="match_parent"
    android:layout_height="match_parent"
    tools:context=".MainActivity">

    <com.hbb20.CountryCodePicker
        app:ccp_hintExampleNumber="true"
        android:id="@+id/country_code_picker"
        android:clickable="true"
        android:focusable="true"
        android:layout_width="wrap_content"
        android:layout_height="match_parent">

    </com.hbb20.CountryCodePicker>

</RelativeLayout>

To hide flag
app:ccp_showFlag=”false”

To hide Name code
app:ccp_showNameCode=”false”

  • In your MainActivity.kt
import android.support.v7.app.AppCompatActivity
import android.os.Bundle
import android.widget.Toast
import com.hbb20.CCPCountry
import com.hbb20.CountryCodePicker

class MainActivity : AppCompatActivity() ,CountryCodePicker.OnCountryChangeListener{
    private var ccp:CountryCodePicker?=null
    private var countryCode:String?=null
    private var countryName:String?=null

    override fun onCreate(savedInstanceState: Bundle?) {
        super.onCreate(savedInstanceState)
        setContentView(R.layout.activity_main)

         ccp = findViewById(R.id.country_code_picker)
        ccp!!.setOnCountryChangeListener(this)

        //to set default country code as Japan
        
        ccp!!.setDefaultCountryUsingNameCode("JP")
    }

    override fun onCountrySelected() {
        countryCode=ccp!!.selectedCountryCode
        countryName=ccp!!.selectedCountryName

        Toast.makeText(this,"Country Code "+countryCode,Toast.LENGTH_SHORT).show()
        Toast.makeText(this,"Country Name "+countryName,Toast.LENGTH_SHORT).show()
    }

}

That’s it! Now run the project!

Thanks for reading!