Flutter Localization

Localization is used to translate the application to several languages. Almost all of the apps needs localization for better user enagement.

Here we are going to implement Localization in a sample-simple flutter application.

Initial Setup for Localization

Add following dependancy in pubspec.yaml

provider: ^4.0.5

Provider is used to update and manage the state of the application, I am using provider and view model class to switch languages.

Add following files

app_localization.dart

AppLocalization class contains following functions

  • load function will load the string resources from the desired Locale as you can see in the parameter.
  • of function will be a helper like any other InheritedWidget to facilitate access to any string from any part of the app code.
  • translate this method is used to translate words from the json files

    add the file in lib/localization folder
import 'dart:convert';

import 'package:flutter/material.dart';
import 'package:flutter/services.dart';
import 'package:localization_app/localization/supportedLanguages.dart';

class AppLocalization {
  // Helper method to keep the code in the widgets concise
  // Localizations are accessed using an InheritedWidget "of" syntax
  static AppLocalization of(BuildContext context) {
    return Localizations.of<AppLocalization>(context, AppLocalization);
  }

  // Static member to have a simple access to the delegate from the MaterialApp
  static const LocalizationsDelegate<AppLocalization> delegate =
      _AppLocalizationsDelegate();

  Map<String, String> _localizedStrings;

  Future<dynamic> load(locale) async {
    // Load the language JSON file from the "lang" folder
    // print("DATAAA" + 'assets/language/${locale.languageCode}.json');
    String jsonString = await rootBundle
        .loadString('assets/language/${locale.languageCode}.json');
    Map<String, dynamic> jsonMap = json.decode(jsonString);

    _localizedStrings = jsonMap.map((key, value) {
      return MapEntry(key, value.toString());
    });

    return true;
  }

  // This method will be called from every widget which needs a localized text
  String translate(String key) {
    return _localizedStrings[key] ?? "Missing Localized String";
  }
}

class _AppLocalizationsDelegate extends LocalizationsDelegate<AppLocalization> {
  // This delegate instance will never change (it doesn't even have fields!)
  // It can provide a constant constructor.
  const _AppLocalizationsDelegate();

  @override
  bool isSupported(Locale locale) {
    // Include all of your supported language codes here
    return supportedLanguages.contains(locale.languageCode) ||
        supportedLanguages.contains(locale);
  }

  @override
  Future<AppLocalization> load(Locale locale) async {
    // AppLocalizations class is where the JSON loading actually runs
    AppLocalization localizations = new AppLocalization();
    await localizations.load(locale);
    return localizations;
  }

  @override
  bool shouldReload(_AppLocalizationsDelegate old) => true;
}

supported_languages.dart

add the file in lib/localization folder

import 'dart:ui';

const supportedLanguages = [
  const Locale.fromSubtags(languageCode: 'en'), // generic Chinese 'zh'
  const Locale.fromSubtags(
      languageCode: 'zh',
      scriptCode: 'Hant'), // generic traditional Chinese 'zh_Hant'
];

Translated Json files

  • en.json file includes all the words for English
  • zh.json file has all the words in Chinese

    add this file in assets/language folder


en.json

{
  "TITLE":"Localization Example"

}

zh.json

{
  "TITLE": "本地化示例"
}

Now we have added all required files for Localization.

Lets move to the implementation part

Implement Localization in App

add the following code in main.dart

import 'package:flutter/cupertino.dart';
import 'package:flutter/material.dart';
import 'package:localization_app/localization/LocalizationKeys.dart';
import 'package:localization_app/localization/app_localizations.dart';
import 'package:localization_app/localization/supported_languages.dart';
import 'package:localization_app/view_models/settings_view_model.dart';
import 'package:provider/provider.dart';

void main() {
  runApp(MyApp());
}

class MyApp extends StatelessWidget {
  // This widget is the root of your application.
  @override
  Widget build(BuildContext context) {
    return MultiProvider(
      providers: [
        ChangeNotifierProvider(
          create: (context) => SettingsViewModel(),
        ),
      ],
      child: Consumer<SettingsViewModel>(
        builder: (context, viewModel, child) {
          return MaterialApp(
            supportedLocales: supportedLanguages,
            localizationsDelegates: [
              AppLocalization.delegate,
              DefaultMaterialLocalizations.delegate,
              DefaultWidgetsLocalizations.delegate,
              DefaultCupertinoLocalizations.delegate,
            ],
            locale: viewModel.getLocale,
            title: 'Localization Example',
            theme: ThemeData(
              primarySwatch: Colors.blue,
            ),
            home: MyHomePage(title: 'Localization Example'),
          );
        },
      ),
    );
  }
}

class MyHomePage extends StatefulWidget {
  MyHomePage({Key key, this.title}) : super(key: key);

  final String title;

  @override
  _MyHomePageState createState() => _MyHomePageState();
}

class _MyHomePageState extends State<MyHomePage> {
  @override
  Widget build(BuildContext context) {
    return Consumer<SettingsViewModel>(builder: (context, model, child) {
      return MaterialApp(
        home: Scaffold(
          appBar: AppBar(
            title: Text(widget.title),
          ),
          body: Center(
            child: Column(
              mainAxisAlignment: MainAxisAlignment.center,
              children: <Widget>[
                Text(
                  AppLocalization.of(context).translate("TITLE"),
                ),
                ElevatedButton(
                    onPressed: () {
                      model.setLocale(model.getLocale == Locale("en")
                          ? Locale("zh")
                          : Locale("en"));
                    },
                    child: Text("Change Language"))
              ],
            ),
          ),
        ),
      );
    });
  }
}
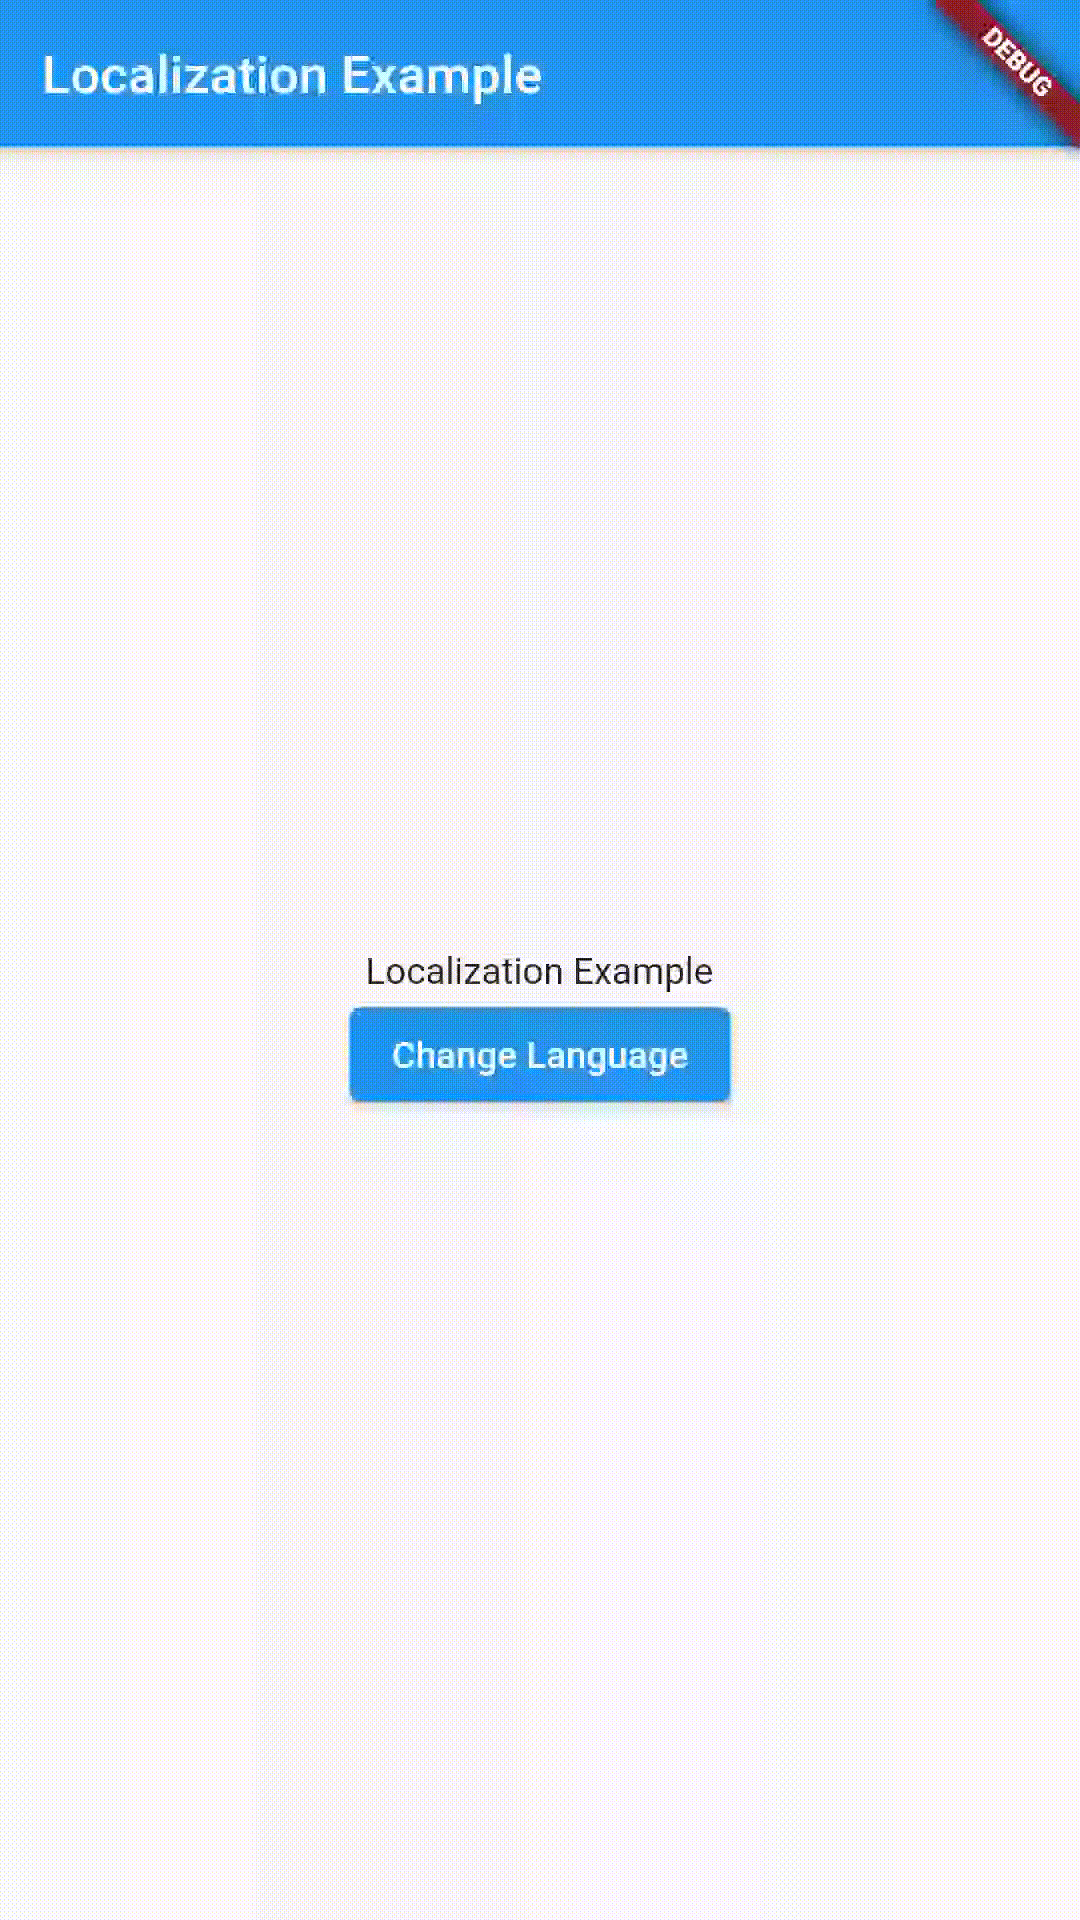
  • HomePage has a Text widget and a ElevatedButton to switch languages.
  • In onPress of ElevatedButton we are switching languages based on the current language.

Don’t forget Add following line in pubspec.yaml

  assets:
    - assets/language/

Now we are all set to run the Application

Output

​The full source code is available here.

That’s it!! Thanks for Reading


DatePicker Flutter

Date Picker is very usefull fuction which shows a picker dialog to select date.

Please find below code for a Simple date Picker Fuction

  showDatePickrDialog(BuildContext context) {
    Future<DateTime> selectedDate = showDatePicker(
      context: context,
      initialDate: DateTime(2000),
      firstDate: DateTime(1900),
      lastDate: DateTime(2020),
      builder: (BuildContext context, Widget child) {
        return Theme(
          data: ThemeData.dark(),
          child: child,
        );
      },
    );
    selectedDate.then((value) {
      var date = DateFormat('dd-MM-yyyy').format(value);
      print("SELECTED_DATE==$date");
    });
  }


Thanks for reading!


Simple SharedPreference Functions – Kotlin

Android provides many ways of storing data of an application. One of these ways is called Shared Preferences. Shared Preferences allow you to save and retrieve data in the form of key, value pair.

Here I share a simple custom SharedPreferences.kt class that can be used for every Android application if needed.

import android.content.Context
import android.content.SharedPreferences
import com.securepreferences.SecurePreferences

/**
 * Created by Sayandh-Kolincodes on 10/05/2018.
 */

class SharedPreference(val context: Context) {
    private val PREFS_NAME = "your_app_preference_name"

    private val sharedPref: SharedPreferences =
        context.getSharedPreferences(PREFS_NAME, Context.MODE_PRIVATE)

    fun save(KEY_NAME: String, text: String) {

        val editor: SharedPreferences.Editor = sharedPref.edit()

        editor.putString(KEY_NAME, text)

        editor.commit()
    }

    fun save(KEY_NAME: String, value: Int) {
        val editor: SharedPreferences.Editor = sharedPref.edit()

        editor.putInt(KEY_NAME, value)

        editor.commit()
    }

    fun save(KEY_NAME: String, status: Boolean) {

        val editor: SharedPreferences.Editor = sharedPref.edit()

        editor.putBoolean(KEY_NAME, status)

        editor.commit()
    }

    fun getValueString(KEY_NAME: String): String? {

        return sharedPref.getString(KEY_NAME, null)


    }

    fun getValueInt(KEY_NAME: String): Int {

        return sharedPref.getInt(KEY_NAME, 0)
    }

    fun getValueBoolien(KEY_NAME: String, defaultValue: Boolean): Boolean {

        return sharedPref.getBoolean(KEY_NAME, defaultValue)

    }

    fun clearSharedPreference() {

        val editor: SharedPreferences.Editor = sharedPref.edit()

        //sharedPref = PreferenceManager.getDefaultSharedPreferences(context);

        editor.clear()
        editor.commit()
    }

    fun removeValue(KEY_NAME: String) {

        val editor: SharedPreferences.Editor = sharedPref.edit()

        editor.remove(KEY_NAME)
        editor.commit()
    }

}

You can find the Github repo for this class here

Room Database with Kotlin

Room is a persistence library, part of the Android Jetpack.
The Room is now considered as a better approach for data storing than SQLiteDatabase.
The Room persistence library provides an abstraction layer over SQLite to allow for more robust database access while harnessing the full power of SQLite.

Why Room?

  • Compile-time verification of SQL queries.
  • You need to use lots of boilerplate code to convert between SQL queries and Java/Kotlin data objects. But, Room maps our database objects to Java Object without boilerplate code.
  • Room is built to work with Live data and RxJava

Room has 3 main components

  1. Entity: Represents table within the database. We can create a table in room database using @Entity annotation
  2. Dao: Contains all the methods used for accessing data from the database.
  3. Database: Contains the database holder and serves as the main access point for the underlying connection to your app’s persisted, relational data.

Implementation

To add Room database add the below lines into your app-level build.gradle file

implementation "androidx.room:room-runtime:2.2.4"
kapt "androidx.room:room-compiler:2.2.4"
implementation "androidx.room:room-ktx:2.2.4"

Don’t forget to add apply plugin: ‘kotlin-kapt’ in top your app-level build.gradle file

Creating Model Class

Room creates a table for each model class annotated with @Entity, the fields in the class correspond to a column in the table. Therefore each entity class tends to be a small model class contains no logic.

We are going to create a small class User represents a model for the data in the database.

Create a model class as shown below.

package com.kotlincodes.roomdatabasekotlin.model

import androidx.room.Entity
import androidx.room.PrimaryKey

@Entity(tableName = "users")
data class UserModel (
    @PrimaryKey(autoGenerate = true)
    var id:Int,
    var name:String,
    var mobile:String,
    var age:Int
)

Creating DAOs (Data Access Object)

DAOs contain all methods that are used to access data from database.

To create a DAO we need to create an interface annotated with @Dao

import androidx.room.Dao
import androidx.room.Insert
import androidx.room.Query
import androidx.room.Update
import com.kotlincodes.roomdatabasekotlin.model.UserModel

@Dao
interface UserDao {

    @Insert
    fun insert(user:UserModel)

    @Update
    fun update(user:UserModel)

    @Update
    fun delete(user:UserModel)

    @Query("SELECT * FROM USERS")
    fun getAllUsers():List<UserModel>

    @Query("SELECT * FROM USERS WHERE id==:id")
    fun getUserWithId(id:Int):UserModel
}

Creating Database

To create a database we need to define an abstract class that extends RoomDatabase. This class is annotated with @Database, lists the entities contained in the database, and the DAOs which access them.

import android.content.Context
import androidx.room.Database
import androidx.room.Room
import androidx.room.RoomDatabase
import com.kotlincodes.roomdatabasekotlin.model.UserModel


@Database(entities = [UserModel::class], version =1, exportSchema = false)
abstract class AppDatabase : RoomDatabase() {
    abstract fun users():UserDao


    companion object {
        private var INSTANCE: AppDatabase? = null
        fun getAppDatabase(context: Context): AppDatabase? {
            if (INSTANCE == null) {
                INSTANCE = Room.databaseBuilder(
                    context.applicationContext,
                    AppDatabase::class.java, "room-kotlin-database"
                ).build()
            }
            return INSTANCE
        }

        fun destroyInstance() {
            INSTANCE = null
        }
    }
}

Now we are ready to access the database using Room.

Make sure that you are not performing any database operations on the main thread. We need to execute all database operations in a separate thread otherwise the application will crash.

Initialize

val locaDb= AppDatabase.getAppDatabase(this)!!

Insert

locaDb.users().insert(user)

Update

locaDb.users().update(user)

Delete

locaDb.users().update(user)

That’s it!! I have created a repo with a small project with Room database operations Here

Android spinner Using Kotlin With Example

Spinners provide a way to select one value from a list set.
In the default state, a spinner shows its currently selected value.

Create a new Project in Kotlin

  1. Open Android Studio.
  2. Go to File => New => New Project. Write application name as Spinner. Then, check Include Kotlin Support and click next button.
  3. Select minimum SDK you need. However, we have selected 17 as minimum SDK. Then, click next button
  4. Then, select Empty Activity => click next => click finish.
  5. You will get a newly created project successfully if you have followed steps properly.

Use the below code to Implement a Spinner with Kotlin

MainActivity.kt
package com.example.myapplicationkotlinetest

import android.support.v7.app.AppCompatActivity

import android.os.Bundle

import kotlinx.android.synthetic.main.activity_main.*

import android.view.View

import android.widget.*

import java.util.ArrayList as ArrayList1

class MainActivity : AppCompatActivity(),AdapterView.OnItemSelectedListener {
val languagesList = ArrayList()
var spinnerlanguages:Spinner? = null
var textView_languages:TextView? = null

override fun onCreate(savedInstanceState: Bundle?) {
    super.onCreate(savedInstanceState)
    setContentView(R.layout.activity_main)
    textView_languages = this.msg
    spinnerlanguages = this.spinner_sample
    languagesList.add("English")
    languagesList.add("French")
    languagesList.add("Hindi")

    spinnerlanguages!!.setOnItemSelectedListener(this)

    // Create an ArrayAdapter using a simple spinner layout and languages array
    val aa = ArrayAdapter(this, android.R.layout.simple_spinner_item, languagesList)
    // Set layout to use when the list of choices appear
    aa.setDropDownViewResource(android.R.layout.simple_spinner_dropdown_item)
    // Set Adapter to Spinner
    spinnerlanguages!!.setAdapter(aa)

}

override fun onItemSelected(arg0: AdapterView<*>, arg1: View, position: Int, id: Long) {
    textView_languages!!.text = "Selected language: "+languagesList[position]
}

override fun onNothingSelected(arg0: AdapterView<*>) {

}
}

activity_main.xml

<LinearLayout xmlns:android="http://schemas.android.com/apk/res/android"

    android:orientation="vertical   " 
    android:layout_width="match_parent"
    android:layout_height="wrap_content">

<TextView
        android:id="@+id/msg"
        android:layout_width="wrap_content"
        android:layout_height="wrap_content"
        android:textSize="25dp"
        android:padding="20dp"/>

<Spinner
        android:id="@+id/spinner_sample"
        android:layout_width="wrap_content"
        android:layout_height="wrap_content"/>
        
</LinearLayout>

Bottom Navigation View Android

BottomNavigationView creates bottom navigation bars, making it easy to explore and switch between top-level content views with a single tap.

Bottom Navigation Bar always stays at the bottom of your application and provides navigation between the views of your application.

Prerequisites

To be able to follow this tutorial, you’ll need:

Adding the Bottom NavigationView

To use BottomNavigationView in your project, make sure you have added the design support and the Android support artifact. To add these in your project add the below dependencies in your buid.gardle file

implementation 'com.android.support:design:28.0.0'

Now add the BottomNavigationView in the activity_main.xml file. Note that the FrameLayout serve as a container for the different fragments that are placed on it whenever the BottomNavigationView menu items are clicked. Add the below code in the activity_main.xml file.

<?xml version="1.0" encoding="utf-8"?>
<android.support.constraint.ConstraintLayout
        xmlns:android="http://schemas.android.com/apk/res/android"
        xmlns:tools="http://schemas.android.com/tools"
        android:layout_width="match_parent"
        android:layout_height="match_parent" xmlns:app="http://schemas.android.com/apk/res-auto"
        tools:context=".MainActivity">

    <FrameLayout
            android:id="@+id/container"
            android:layout_width="match_parent"
            android:layout_height="match_parent"/>


    <android.support.design.widget.BottomNavigationView
            android:id="@+id/navigationView"
            android:layout_width="0dp"
            android:layout_height="wrap_content"
            android:layout_marginEnd="0dp"
            android:layout_marginStart="0dp"
            android:background="?android:attr/windowBackground"
            app:layout_constraintBottom_toBottomOf="parent"
            app:layout_constraintLeft_toLeftOf="parent"
            app:layout_constraintRight_toRightOf="parent"
            app:itemBackground="@color/colorPrimary"
    />
</android.support.constraint.ConstraintLayout>

Here in the BottomNavigationView the menu items are added with bottom_menu.xml file

Add a file bottom_menu.xml in res/menu directory.

bottom_menu.xml

<?xml version="1.0" encoding="utf-8"?>
<menu xmlns:android="http://schemas.android.com/apk/res/android">

    <item
            android:id="@+id/navigation_songs"
            android:icon="@drawable/ic_action_favorites"
            android:title="@string/favorites"/>

    <item
            android:id="@+id/navigation_albums"
            android:icon="@drawable/ic_action_home"
            android:title="@string/home"/>

    <item
            android:id="@+id/navigation_artists"
            android:icon="@drawable/ic_action_settings"
            android:title="@string/settings"/>

</menu>

Setting the Activity class

Now we are going to setup NavigationView and NavigationItemSelectedListener .

package com.kotlincodes.bottomnavigationview

import android.support.v7.app.AppCompatActivity
import android.os.Bundle
import android.support.v4.app.Fragment
import kotlinx.android.synthetic.main.activity_main.*

class MainActivity : AppCompatActivity()  {

    override fun onCreate(savedInstanceState: Bundle?) {
        super.onCreate(savedInstanceState)
        setContentView(R.layout.activity_main)

        title=resources.getString(R.string.favorites)
        loadFragment(FavoriteFragment())

        navigationView.setOnNavigationItemSelectedListener {
            when(it.itemId){
                R.id.navigation_fav-> {
                    title=resources.getString(R.string.favorites)
                    loadFragment(FavoriteFragment())
                    return@setOnNavigationItemSelectedListener true
                }

                R.id.navigation_home-> {
                    title=resources.getString(R.string.home)
                    loadFragment(HomeFragment())
                    return@setOnNavigationItemSelectedListener true
                }

                R.id.navigation_settings-> {
                    title=resources.getString(R.string.settings)
                    loadFragment(SettingsFragment())
                    return@setOnNavigationItemSelectedListener true
                }

            }
            false

        }
    }

    private fun loadFragment(fragment: Fragment) {
        // load fragment
        val transaction = supportFragmentManager.beginTransaction()
        transaction.replace(R.id.container, fragment)
        transaction.addToBackStack(null)
        transaction.commit()
    }
}

Here we are not using the findViewById method to bind the views, we are just using synthetic binding extensions from Kotlin by importing the following

import kotlinx.android.synthetic.main.activity_main.*

We’ll start with the FavoriteFragment.kt class and you should follow a similar process for the remaining two fragment classes—HomeFragment.kt and SettingsFragment.kt.

The fragment added here is the basic one just uses one TextView, you can replace it with any Fragment.

FavoriteFragment.kt

package com.kotlincodes.bottomnavigationview

import android.os.Bundle
import android.support.v4.app.Fragment
import android.view.LayoutInflater
import android.view.View
import android.view.ViewGroup

class FavoriteFragment : Fragment(){
    override fun onCreateView(inflater: LayoutInflater, container: ViewGroup?, savedInstanceState: Bundle?): View? {
        return inflater.inflate(R.layout.fragment_fav,container,false)

    }
}

fragmet_fav.xml

<?xml version="1.0" encoding="utf-8"?>
<RelativeLayout
        xmlns:android="http://schemas.android.com/apk/res/android"
        android:layout_width="match_parent"
        android:layout_height="match_parent">

    <TextView android:layout_width="match_parent"
              android:layout_centerInParent="true"
              android:textAlignment="center"
              android:textSize="18sp"
              android:text="@string/favorites"
              android:layout_height="wrap_content"/>
</RelativeLayout>

That’s it! Now run the project! The full source code is available here.

Thanks for reading!

Android Splash Screen with Kotlin

Android Splash Screen is the 1st screen visible to user when app launches. Splash screen displays some animations or App logo for a short time while some data for the next screen are fetched.

Here we are going to implement a Splash Screen for Android with Kotlin.

Splash Screen is very common to most of the Android Applications. It is very easy to create Splash Screen using Handler class.

Create a Style resource

Update your style.xml file as shown below

style.xml

<resources>

    <!-- Base application theme. -->
    <style name="AppTheme" parent="Theme.AppCompat.Light.DarkActionBar">
        <!-- Customize your theme here. -->
        <item name="colorPrimary">@color/colorPrimary</item>
        <item name="colorPrimaryDark">@color/colorPrimaryDark</item>
        <item name="colorAccent">@color/colorAccent</item>
    </style>

    <style name="AppTheme.NoActionBar">
        <item name="windowActionBar">false</item>
        <item name="windowNoTitle">true</item>
    </style>

</resources>

Create Layout XML file for SplashScreen

activity_splash.xml

<?xml version="1.0" encoding="utf-8"?>
<RelativeLayout xmlns:android="http://schemas.android.com/apk/res/android"
    android:background="#464545"
    xmlns:app="http://schemas.android.com/apk/res-auto"
    xmlns:tools="http://schemas.android.com/tools"
    android:layout_width="match_parent"
    android:layout_height="match_parent"
    tools:context=".MainActivity">

    <ImageView
        android:id="@+id/image"
        android:src="@drawable/kotlincodes"
        android:layout_width="100dp"
        android:layout_height="100dp"
        android:layout_centerInParent="true"
        />
    <TextView
        android:id="@+id/text"
        android:textColor="#fff"
        android:gravity="center"
        android:text="kotlincodes.com"
        android:layout_below="@id/image"
        android:layout_width="match_parent"
        android:layout_height="wrap_content" />
    <ProgressBar
        android:layout_below="@id/text"
        android:layout_centerHorizontal="true"
        android:padding="6dp"
        android:layout_width="45dp"
        android:layout_height="45dp" />

</RelativeLayout>

This layout contains an ImageViw ,TextView and a ProgressBar. 

You can replace android:src of the ImageView with your own Image.

Create Splash Screen Activity Class

Here we uses a Handler to make a small delay. You can implement data fetching or any function in postDelayed method in Handler.

SplashScreenActivity.kt

package com.kotlincodes.splashscreenwithkotlin

import android.content.Intent
import android.os.Bundle
import android.os.Handler
import android.support.v7.app.AppCompatActivity

class SplashScreenActivity : AppCompatActivity() {
    private val SPLASH_TIME_OUT:Long=3000 // 3 sec
    override fun onCreate(savedInstanceState: Bundle?) {
        super.onCreate(savedInstanceState)
        setContentView(R.layout.activity_splash)


        Handler().postDelayed({
            // This method will be executed once the timer is over
            // Start your app main activity

            startActivity(Intent(this,MainActivity::class.java))

            // close this activity
            finish()
        }, SPLASH_TIME_OUT)
    }
}

Create a MainActivity 

activity_main.xml

<?xml version="1.0" encoding="utf-8"?>
<RelativeLayout xmlns:android="http://schemas.android.com/apk/res/android"
    android:background="#464545"
    xmlns:app="http://schemas.android.com/apk/res-auto"
    xmlns:tools="http://schemas.android.com/tools"
    android:layout_width="match_parent"
    android:layout_height="match_parent"
    tools:context=".MainActivity">

    <TextView
        android:textSize="22dp"
        android:layout_centerInParent="true"
        android:text="Home Page"
        android:textColor="#fff"
        android:layout_width="wrap_content"
        android:layout_height="wrap_content" />

</RelativeLayout>

MainActivity.kt

package com.kotlincodes.splashscreenwithkotlin

import android.support.v7.app.AppCompatActivity
import android.os.Bundle

class MainActivity : AppCompatActivity() {

    override fun onCreate(savedInstanceState: Bundle?) {
        super.onCreate(savedInstanceState)
        setContentView(R.layout.activity_main)
    }
}

Add SplashScreen Activity as Launch page in manifest

Add the below code in manifets.xml file under application tag.

<activity android:name=".SplashScreenActivity"
            android:theme="@style/AppTheme.NoActionBar"
            >
            <intent-filter>
                <action android:name="android.intent.action.MAIN" />

                <category android:name="android.intent.category.LAUNCHER" />
            </intent-filter>
        </activity>
        <activity android:name=".MainActivity" />
        

That’s it! Now run the project!

The full source code is available here.

Thanks for reading!


Google Map API with Kotlin

Here we are going to learn how to add a google map our project using google maps API with Kotlin.

Here we are developing a simple app with Google map and adding a marker to it.

Generate Google Maps API Key

Before we are starting to use a google map in our project we need to generate a Google Maps API key from Google API Console .

  • Login to Google API Console with your google account
  • Create a project then create credentials –>API Key as shown below
  • Copy Api Key Credential

Add Google Map into our Project

Now we need to add our API Key into our manifest.xml file under application tag.  Copy the below code and add it into the
manifest.xml under application tag.

manifest.xml

<meta-data
            android:name="com.google.android.maps.v2.API_KEY"
            android:value="YOUR_API_KEY"
            />

Don’t forget to replace “YOUR_API_KEY” with your API key from Google API Console

Setup Layout

Now we need to setup our Layout for Google maps. Copy and paste the below code into activity_mail.xml file.

activity_mail.xml

<?xml version="1.0" encoding="utf-8"?>
<LinearLayout xmlns:android="http://schemas.android.com/apk/res/android"
    xmlns:app="http://schemas.android.com/apk/res-auto"
    xmlns:tools="http://schemas.android.com/tools"
    android:layout_width="match_parent"
    android:layout_height="match_parent"
    tools:context=".MainActivity">

    <fragment xmlns:tools="http://schemas.android.com/tools"
        android:name="com.google.android.gms.maps.SupportMapFragment"
        android:id="@+id/map"
        android:layout_width="match_parent"
        android:layout_height="wrap_content">

    </fragment>

</LinearLayout> 

Setup MainActivity.kt

To set up map in our application please copy and paste below code into your activity class.

package com.kotlincodes.googlemapwithkotlin

import android.os.Bundle
import android.support.v7.app.AppCompatActivity
import com.google.android.gms.maps.CameraUpdateFactory
import com.google.android.gms.maps.GoogleMap
import com.google.android.gms.maps.OnMapReadyCallback
import com.google.android.gms.maps.SupportMapFragment
import com.google.android.gms.maps.model.LatLng
import com.google.android.gms.maps.model.MarkerOptions

class MainActivity : AppCompatActivity() ,OnMapReadyCallback {
    private var googleMap:GoogleMap?=null
   override fun onCreate(savedInstanceState: Bundle?) {
        super.onCreate(savedInstanceState)
        setContentView(R.layout.activity_main)
        val mapFragment = supportFragmentManager
                .findFragmentById(R.id.map) as SupportMapFragment
        mapFragment.getMapAsync(this)

    }
    override fun onMapReady(p0: GoogleMap?) {
        googleMap=p0

        //Adding markers to map

        val latLng=LatLng(28.6139,77.2090)
        val markerOptions:MarkerOptions=MarkerOptions().position(latLng).title("New Delhi")

        // moving camera and zoom map

        val zoomLevel = 12.0f //This goes up to 21


        googleMap.let {
            it!!.addMarker(markerOptions)
            it.moveCamera(CameraUpdateFactory.newLatLngZoom(latLng, zoomLevel))
        }
    }
}

That’s it! Now run the project!

The full source code is available here.

Thanks for reading!


Shared Preferences With Kotlin

In this tutorial we are going to learn how to use SharedPreferences In our Android Application to Store data in the form of value-key pairs with a simple Kotlin class.

Here w are going to learn how to create a simple custom SharedPreferences.kt class that can be used to every Android application if needed.

Overview

In many cases, we have to use SharedPreferences in our Application such as to store login status, save user-specific data and save application settings.

SharedPreferences is Application specific, so data stored in SharedPreferences can be lost in the following situations

  • By Uninstalling the Application
  • By Clearing application data (Using device settings)

Storing Data with SharedPreferences

Let’s start with the custom SharedPreference.kt class. Create a Kotlin class And Initialise SharedPreferences as shown below.

package com.kotlincodes.sharedpreferenceswithkotlin

import android.content.Context
import android.content.SharedPreferences

/**
 * Created by Kolincodes on 10/05/2018.
 */

class SharedPreference(val context: Context) {
    private val PREFS_NAME = "kotlincodes"
    val sharedPref: SharedPreferences = context.getSharedPreferences(PREFS_NAME, Context.MODE_PRIVATE)

}

PREF_NAME is the name of preference file.

Storing Data

To store String, Int and Boolean data we have three methods with the same name and different parameters (Method overloading). Add these methods to your  SharedPreference.kt class.

To Store String data

 
 fun save(KEY_NAME: String, value: Int) {
        val editor: SharedPreferences.Editor = sharedPref.edit()

        editor.putInt(KEY_NAME, value)

        editor.commit()
    }
    

To Store Int data

  
  fun save(KEY_NAME: String, value: Int) {
        val editor: SharedPreferences.Editor = sharedPref.edit()

        editor.putInt(KEY_NAME, value)

        editor.commit()
    }
    

To Store Boolean data

 
 fun save(KEY_NAME: String, status: Boolean) {

        val editor: SharedPreferences.Editor = sharedPref.edit()

        editor.putBoolean(KEY_NAME, status!!)

        editor.commit()
    }

Retrieve Data

To Retrieve the data stored in SharedPreferences use the following methods.

To Retrieve String

 
 fun getValueString(KEY_NAME: String): String? {

        return sharedPref.getString(KEY_NAME, null)
    }

To Retrieve Int

fun getValueInt(KEY_NAME: String): Int {

        return sharedPref.getInt(KEY_NAME, 0)
    }
    

To Retrieve Boolien

 
 fun getValueString(KEY_NAME: String): String? {

        return sharedPref.getString(KEY_NAME, null)
    }
    

Remove and Clear

To clear the entire SharedPreferences use the below code

 
 fun clearSharedPreference() {

        val editor: SharedPreferences.Editor = sharedPref.edit()

        //sharedPref = PreferenceManager.getDefaultSharedPreferences(context);

        editor.clear()
        editor.commit()
    }
    

To remove a specific data

 
 fun removeValue(KEY_NAME: String) {

        val editor: SharedPreferences.Editor = sharedPref.edit()

        editor.remove(KEY_NAME)
        editor.commit()
    }
    

Now we are almost done with all the methods inside our SharedPreference.kt class.
Please find the Complete code for  SharedPreference.kt file below.

SharedPreference.kt

package com.kotlincodes.sharedpreferenceswithkotlin

import android.content.Context
import android.content.SharedPreferences

/**
 * Created by Kolincodes on 10/05/2018.
 */

class SharedPreference(val context: Context) {
    private val PREFS_NAME = "kotlincodes"
    val sharedPref: SharedPreferences = context.getSharedPreferences(PREFS_NAME, Context.MODE_PRIVATE)

    fun save(KEY_NAME: String, text: String) {

        val editor: SharedPreferences.Editor = sharedPref.edit()

        editor.putString(KEY_NAME, text)

        editor!!.commit()
    }

    fun save(KEY_NAME: String, value: Int) {
        val editor: SharedPreferences.Editor = sharedPref.edit()

        editor.putInt(KEY_NAME, value)

        editor.commit()
    }

    fun save(KEY_NAME: String, status: Boolean) {

        val editor: SharedPreferences.Editor = sharedPref.edit()

        editor.putBoolean(KEY_NAME, status!!)

        editor.commit()
    }

    fun getValueString(KEY_NAME: String): String? {

        return sharedPref.getString(KEY_NAME, null)


    }

    fun getValueInt(KEY_NAME: String): Int {

        return sharedPref.getInt(KEY_NAME, 0)
    }

    fun getValueBoolien(KEY_NAME: String, defaultValue: Boolean): Boolean {

        return sharedPref.getBoolean(KEY_NAME, defaultValue)

    }

    fun clearSharedPreference() {

        val editor: SharedPreferences.Editor = sharedPref.edit()

        //sharedPref = PreferenceManager.getDefaultSharedPreferences(context);

        editor.clear()
        editor.commit()
    }

    fun removeValue(KEY_NAME: String) {

        val editor: SharedPreferences.Editor = sharedPref.edit()

        editor.remove(KEY_NAME)
        editor.commit()
    }
}

Implement in our Application

N we are going to implement our SharedPreference.kt class in a Simple Android Application.

The Image below Shows the Final output of the project

Setup Layout

The Layout for our MainActivity.kt class is shown below.

<?xml version="1.0" encoding="utf-8"?>
<LinearLayout xmlns:android="http://schemas.android.com/apk/res/android"
    android:orientation="vertical"
    android:layout_margin="12dp"
    xmlns:tools="http://schemas.android.com/tools"
    android:layout_width="match_parent"
    android:layout_height="wrap_content"
    tools:context=".MainActivity">

    <EditText
        android:id="@+id/edt_name"
        android:layout_margin="6dp"
        android:hint="Name"
        android:layout_width="match_parent"
        android:layout_height="wrap_content"

        />
    <EditText
        android:id="@+id/edt_email"
        android:layout_margin="6dp"
        android:hint="Email"
        android:layout_width="match_parent"
        android:layout_height="wrap_content"

        />
    <LinearLayout
        android:layout_marginTop="12dp"
        android:layout_width="match_parent"
        android:layout_height="wrap_content">
        <Button
            android:id="@+id/btn_save"
            android:layout_weight="1"
            android:text="Save"
            android:layout_width="0dp"
            android:layout_height="wrap_content" />
        <Button
            android:id="@+id/btn_retriev"
            android:layout_weight="1"
            android:text="Retrieve"
            android:layout_width="0dp"
            android:layout_height="wrap_content" />
        <Button
            android:id="@+id/btn_clear"
            android:layout_weight="1"
            android:text="Clear"
            android:layout_width="0dp"
            android:layout_height="wrap_content" />

    </LinearLayout>
</LinearLayout>

Setup MainActivity

Our Application have only one page with two EditText and Three Button.

First we Initialize our SharedPreferece.kt class in our MainActivity by

val sharedPreference:SharedPreference=SharedPreference(this)

On Save button click We stores EditText values into SharedPreferences.

On Retrieve Button click we Retrieve the saved data from SharedPreferences and set this data as the EditText hint.

On Clear button click we clear all the data from shared preferences.

Our MainActivity.kt class is given below.

package com.kotlincodes.sharedpreferenceswithkotlin

import android.support.v7.app.AppCompatActivity
import android.os.Bundle
import android.widget.Button
import android.widget.EditText
import android.widget.Toast

class MainActivity : AppCompatActivity() {

    lateinit var edtName:EditText
    lateinit var edtEmail:EditText
    lateinit var btnSave:Button
    lateinit var btnRetrive:Button
    lateinit var btnClear:Button
    override fun onCreate(savedInstanceState: Bundle?) {
        super.onCreate(savedInstanceState)
        setContentView(R.layout.activity_main)
        val sharedPreference:SharedPreference=SharedPreference(this)

        edtName=findViewById(R.id.edt_name)
        edtEmail=findViewById(R.id.edt_email)
        btnClear=findViewById(R.id.btn_clear)
        btnSave=findViewById(R.id.btn_save)
        btnRetrive=findViewById(R.id.btn_retriev)

        btnSave.setOnClickListener {

            val name=edtName.editableText.toString()
            val email=edtEmail.editableText.toString()
            sharedPreference.save("name",name)
            sharedPreference.save("email",email)
            Toast.makeText(this@MainActivity,"Data Stored",Toast.LENGTH_SHORT).show()
            //to save an Int
//            sharedPreference.save("intval",1)

            //to save boolien
//            sharedPreference.save("bool",true)
            
        }
        btnRetrive.setOnClickListener {
            if (sharedPreference.getValueString("name")!=null) {
                edtName.hint = sharedPreference.getValueString("name")!!
                Toast.makeText(this@MainActivity,"Data Retrieved",Toast.LENGTH_SHORT).show()
            }else{
                edtName.hint="NO value found"
            }
            if (sharedPreference.getValueString("email")!=null) {
                edtEmail.hint = sharedPreference.getValueString("email")!!
            }else{
                edtEmail.hint="No value found"
            }


        }

        btnClear.setOnClickListener {
            sharedPreference.clearSharedPreference()
            Toast.makeText(this@MainActivity,"Data Cleared",Toast.LENGTH_SHORT).show()
        }
    }
}

That’s it! Now run the project!

The full source code is available here.

Thanks for reading!


LocationListener With Kotlin

Many of the android applications we uses in daily life  needs users current locations continuously,   Here we are going to implement LocationListener with Kotlin using FusedLocationProviderClient . We have previously used FusedLocationProviderApi which is deprecated now.

Add the permissions & Dependency

To access the location from the device add the following permissions to the manifest.xml file .

<uses-permission android:name=”android.permission.ACCESS_COARSE_LOCATION”/>
<uses-permission android:name=”android.permission.ACCESS_FINE_LOCATION”/>

Add the following dependencies into app level  build.gradle ( Module:app) file.

implementation ‘com.google.android.gms:play-services-location:16.0.0’

Setup the Layout file

Setup layout file for our home screen. It has two Buttons and three TextViews as shown below

activity_main.xml

<?xml version="1.0" encoding="utf-8"?>
<LinearLayout 
    xmlns:android="http://schemas.android.com/apk/res/android"
    android:orientation="vertical"
    xmlns:app="http://schemas.android.com/apk/res-auto"
    xmlns:tools="http://schemas.android.com/tools"
    android:layout_width="match_parent"
    android:layout_height="match_parent"
    tools:context=".MainActivity">

    <Button
        android:id="@+id/btn_start_upds"
        android:layout_width="match_parent"
        android:layout_marginRight="12dp"
        android:layout_marginLeft="12dp"
        android:layout_marginTop="24dp"
        android:layout_height="wrap_content"
        android:text="Start Location UPDates" />
    <Button
        android:enabled="false"
        android:id="@+id/btn_stop_upds"
        android:layout_width="match_parent"
        android:layout_marginRight="12dp"
        android:layout_marginLeft="12dp"
        android:layout_height="wrap_content"
        android:text="Stop Location UPDates" />


    <TextView
        android:padding="12dp"
        android:layout_marginTop="12dp"
        android:textSize="18sp"
        android:layout_marginRight="12dp"
        android:layout_marginLeft="12dp"
        android:layout_width="wrap_content"
        android:layout_gravity="center_horizontal"
        android:layout_height="wrap_content"
        android:id="@+id/txtLat"
        />
    <TextView
        android:padding="12dp"
        android:layout_gravity="center_horizontal"
        android:textSize="18sp"
        android:layout_marginRight="12dp"
        android:layout_marginLeft="12dp"
        android:layout_width="wrap_content"
        android:layout_height="wrap_content"
        android:id="@+id/txtLong"
        />
    <TextView
        android:layout_gravity="center_horizontal"
        android:padding="12dp"
        android:textSize="18sp"
        android:layout_marginRight="12dp"
        android:layout_marginLeft="12dp"
        android:layout_width="wrap_content"
        android:layout_height="wrap_content"
        android:id="@+id/txtTime" />
    
</LinearLayout>

Setup the MainActivity

Here we are going to learn how to implement location Listener in our MainActivity.kt Class with all details.

First we have to initialize

Check Permissions

From android version 6 (Marshmallow ) user have to accept all the permissions in run time. So we have to check whether used accepted all the permissions needed in run time .

We have added the permissions in manifest file already now to show the Runtime permission, You should do the following method.

  
  fun checkPermissionForLocation(context: Context): Boolean {
        return if (Build.VERSION.SDK_INT >= Build.VERSION_CODES.M) {

            if (context.checkSelfPermission(Manifest.permission.ACCESS_FINE_LOCATION) ==
                    PackageManager.PERMISSION_GRANTED){
                true
            }else{
                // Show the permission request
                ActivityCompat.requestPermissions(this, arrayOf(android.Manifest.permission.ACCESS_FINE_LOCATION),
                        REQUEST_PERMISSION_LOCATION)
                false
            }
        } else {
            true
        }
    }
    

Now we have to implement onRequestPermissionsResult method to check if the permission is granted or not by the user.

override fun onRequestPermissionsResult(requestCode: Int, permissions: Array<out String>, grantResults: IntArray) {
    if (requestCode == REQUEST_PERMISSION_LOCATION) {
        if (grantResults[0] == PackageManager.PERMISSION_GRANTED) {
    //We have to add startlocationUpdate() method later instead of Toast
            Toast.makeText(this,"Permission granted",Toast.LENGTH_SHORT).show()
        }
    }
}

Check Location is ON

To check location is on we have to add the following code to our project.

private fun buildAlertMessageNoGps() {

    val builder = AlertDialog.Builder(this)
    builder.setMessage("Your GPS seems to be disabled, do you want to enable it?")
            .setCancelable(false)
            .setPositiveButton("Yes") { dialog, id ->
startActivityForResult(Intent(Settings.ACTION_LOCATION_SOURCE_SETTINGS)
                        , 11)
            }
.setNegativeButton("No") { dialog, id ->
dialog.cancel()
                finish()
            }
val alert: AlertDialog  = builder.create()
    alert.show()


}

Setup LocationListener

Now we are going to setup the LocationListener using startLocationUpdates() method. Before that we have to add a LocationCallback as given below.

  
  private val mLocationCallback = object : LocationCallback() {
        override fun onLocationResult(locationResult: LocationResult) {
            // do work here
            locationResult.lastLocation
            onLocationChanged(locationResult.lastLocation)
        }
    }

    fun onLocationChanged(location: Location) {
        // New location has now been determined

       mLastLocation = location
        if (mLastLocation != null) {
// Update the UI from here
        }

        
    }
    

Now Add startLocationUpdates() method to your code as follows

 
 protected fun startLocationUpdates() {

        // Create the location request to start receiving updates
        mLocationRequest = LocationRequest()
        mLocationRequest!!.priority = LocationRequest.PRIORITY_HIGH_ACCURACY
        mLocationRequest!!.setInterval(INTERVAL)
        mLocationRequest!!.setFastestInterval(FASTEST_INTERVAL)

        // Create LocationSettingsRequest object using location request
        val builder = LocationSettingsRequest.Builder()
        builder.addLocationRequest(mLocationRequest!!)
        val locationSettingsRequest = builder.build()

        val settingsClient = LocationServices.getSettingsClient(this)
        settingsClient.checkLocationSettings(locationSettingsRequest)

        mFusedLocationProviderClient = LocationServices.getFusedLocationProviderClient(this)
        // new Google API SDK v11 uses getFusedLocationProviderClient(this)
        if (ActivityCompat.checkSelfPermission(this, Manifest.permission.ACCESS_FINE_LOCATION) != PackageManager.PERMISSION_GRANTED && ActivityCompat.checkSelfPermission(this, Manifest.permission.ACCESS_COARSE_LOCATION) != PackageManager.PERMISSION_GRANTED) {


            return
        }
        mFusedLocationProviderClient!!.requestLocationUpdates(mLocationRequest, mLocationCallback,
                Looper.myLooper())
    }
    

To Stop Location Updates add the following

 
 private fun stoplocationUpdates() {
        mFusedLocationProviderClient!!.removeLocationUpdates(mLocationCallback)
    }
    

Now we are all set to run the project. Please find the Complete code for MainActivity.kt file below.

MainActivity.kt

package com.kotlincodes.locationlistenerwithkotlin

import android.Manifest
import android.content.Context
import android.content.Intent
import android.content.pm.PackageManager
import android.location.Location
import android.location.LocationManager
import android.os.Build
import android.os.Bundle
import android.os.Looper
import android.provider.Settings
import android.support.v4.app.ActivityCompat
import android.support.v7.app.AlertDialog
import android.support.v7.app.AppCompatActivity
import android.widget.Button
import android.widget.TextView
import android.widget.Toast
import com.google.android.gms.location.*
import java.text.SimpleDateFormat
import java.util.*


class MainActivity : AppCompatActivity() {
    private var mFusedLocationProviderClient: FusedLocationProviderClient? = null
    private val INTERVAL: Long = 2000
    private val FASTEST_INTERVAL: Long = 1000
    lateinit var mLastLocation: Location
    internal lateinit var mLocationRequest: LocationRequest
    private val REQUEST_PERMISSION_LOCATION = 10

    lateinit var btnStartupdate: Button
    lateinit var btnStopUpdates: Button
    lateinit var txtLat: TextView
    lateinit var txtLong: TextView
    lateinit var txtTime: TextView

    override fun onCreate(savedInstanceState: Bundle?) {
        super.onCreate(savedInstanceState)
        setContentView(R.layout.activity_main)

        mLocationRequest = LocationRequest()

        btnStartupdate = findViewById(R.id.btn_start_upds)
        btnStopUpdates = findViewById(R.id.btn_stop_upds)
        txtLat = findViewById(R.id.txtLat);
        txtLong = findViewById(R.id.txtLong);
        txtTime = findViewById(R.id.txtTime);

        val locationManager = getSystemService(Context.LOCATION_SERVICE) as LocationManager
        if (!locationManager.isProviderEnabled(LocationManager.GPS_PROVIDER)) {
            buildAlertMessageNoGps()
        }


        btnStartupdate.setOnClickListener {
            if (checkPermissionForLocation(this)) {
                startLocationUpdates()
                btnStartupdate.isEnabled = false
                btnStopUpdates.isEnabled = true
            }
        }

        btnStopUpdates.setOnClickListener {
            stoplocationUpdates()
            txtTime.text = "Updates Stoped"
            btnStartupdate.isEnabled = true
            btnStopUpdates.isEnabled = false
        }

    }

    private fun buildAlertMessageNoGps() {

        val builder = AlertDialog.Builder(this)
        builder.setMessage("Your GPS seems to be disabled, do you want to enable it?")
                .setCancelable(false)
                .setPositiveButton("Yes") { dialog, id ->
                    startActivityForResult(Intent(Settings.ACTION_LOCATION_SOURCE_SETTINGS)
                            , 11)
                }
                .setNegativeButton("No") { dialog, id ->
                    dialog.cancel()
                    finish()
                }
        val alert: AlertDialog = builder.create()
        alert.show()


    }


    protected fun startLocationUpdates() {

        // Create the location request to start receiving updates

        mLocationRequest!!.priority = LocationRequest.PRIORITY_HIGH_ACCURACY
        mLocationRequest!!.setInterval(INTERVAL)
        mLocationRequest!!.setFastestInterval(FASTEST_INTERVAL)

        // Create LocationSettingsRequest object using location request
        val builder = LocationSettingsRequest.Builder()
        builder.addLocationRequest(mLocationRequest!!)
        val locationSettingsRequest = builder.build()

        val settingsClient = LocationServices.getSettingsClient(this)
        settingsClient.checkLocationSettings(locationSettingsRequest)

        mFusedLocationProviderClient = LocationServices.getFusedLocationProviderClient(this)
        // new Google API SDK v11 uses getFusedLocationProviderClient(this)
        if (ActivityCompat.checkSelfPermission(this, Manifest.permission.ACCESS_FINE_LOCATION) != PackageManager.PERMISSION_GRANTED && ActivityCompat.checkSelfPermission(this, Manifest.permission.ACCESS_COARSE_LOCATION) != PackageManager.PERMISSION_GRANTED) {


            return
        }
        mFusedLocationProviderClient!!.requestLocationUpdates(mLocationRequest, mLocationCallback,
                Looper.myLooper())
    }

    private val mLocationCallback = object : LocationCallback() {
        override fun onLocationResult(locationResult: LocationResult) {
            // do work here
            locationResult.lastLocation
            onLocationChanged(locationResult.lastLocation)
        }
    }

    fun onLocationChanged(location: Location) {
        // New location has now been determined

        mLastLocation = location
        val date: Date = Calendar.getInstance().time
        val sdf = SimpleDateFormat("hh:mm:ss a")
        txtTime.text = "Updated at : " + sdf.format(date)
        txtLat.text = "LATITUDE : " + mLastLocation.latitude
        txtLong.text = "LONGITUDE : " + mLastLocation.longitude
        // You can now create a LatLng Object for use with maps
    }

    private fun stoplocationUpdates() {
        mFusedLocationProviderClient!!.removeLocationUpdates(mLocationCallback)
    }


    override fun onRequestPermissionsResult(requestCode: Int, permissions: Array<out String>, grantResults: IntArray) {
        if (requestCode == REQUEST_PERMISSION_LOCATION) {
            if (grantResults[0] == PackageManager.PERMISSION_GRANTED) {
                startLocationUpdates()
                btnStartupdate.isEnabled = false
                btnStopUpdates.isEnabled = true
            } else {
                Toast.makeText(this@MainActivity, "Permission Denied", Toast.LENGTH_SHORT).show()
            }
        }
    }

    fun checkPermissionForLocation(context: Context): Boolean {
        return if (Build.VERSION.SDK_INT >= Build.VERSION_CODES.M) {

            if (context.checkSelfPermission(Manifest.permission.ACCESS_FINE_LOCATION) ==
                    PackageManager.PERMISSION_GRANTED) {
                true
            } else {
                // Show the permission request
                ActivityCompat.requestPermissions(this, arrayOf(android.Manifest.permission.ACCESS_FINE_LOCATION),
                        REQUEST_PERMISSION_LOCATION)
                false
            }
        } else {
            true
        }
    }

}

That’s it! Now run the project!

The full source code is available here.

Thanks for reading!