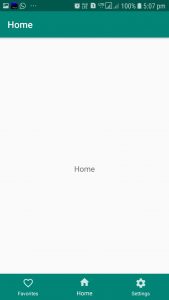
BottomNavigationView creates bottom navigation bars, making it easy to explore and switch between top-level content views with a single tap.
Bottom Navigation Bar always stays at the bottom of your application and provides navigation between the views of your application.
Prerequisites
To be able to follow this tutorial, you’ll need:
- Android Studio 3.0 or higher
- Kotlin plugin 1.1.51 or higher
Adding the Bottom NavigationView
To use BottomNavigationView in your project, make sure you have added the design support and the Android support artifact. To add these in your project add the below dependencies in your buid.gardle file
implementation 'com.android.support:design:28.0.0'Now add the BottomNavigationView in the activity_main.xml file. Note that the FrameLayout serve as a container for the different fragments that are placed on it whenever the BottomNavigationView menu items are clicked. Add the below code in the activity_main.xml file.
<?xml version="1.0" encoding="utf-8"?>
<android.support.constraint.ConstraintLayout
        xmlns:android="http://schemas.android.com/apk/res/android"
        xmlns:tools="http://schemas.android.com/tools"
        android:layout_width="match_parent"
        android:layout_height="match_parent" xmlns:app="http://schemas.android.com/apk/res-auto"
        tools:context=".MainActivity">

    <FrameLayout
            android:id="@+id/container"
            android:layout_width="match_parent"
            android:layout_height="match_parent"/>


    <android.support.design.widget.BottomNavigationView
            android:id="@+id/navigationView"
            android:layout_width="0dp"
            android:layout_height="wrap_content"
            android:layout_marginEnd="0dp"
            android:layout_marginStart="0dp"
            android:background="?android:attr/windowBackground"
            app:layout_constraintBottom_toBottomOf="parent"
            app:layout_constraintLeft_toLeftOf="parent"
            app:layout_constraintRight_toRightOf="parent"
            app:itemBackground="@color/colorPrimary"
    />
</android.support.constraint.ConstraintLayout>
Here in the BottomNavigationView the menu items are added with bottom_menu.xml file
Add a file bottom_menu.xml in res/menu directory.
bottom_menu.xml
<?xml version="1.0" encoding="utf-8"?>
<menu xmlns:android="http://schemas.android.com/apk/res/android">

    <item
            android:id="@+id/navigation_songs"
            android:icon="@drawable/ic_action_favorites"
            android:title="@string/favorites"/>

    <item
            android:id="@+id/navigation_albums"
            android:icon="@drawable/ic_action_home"
            android:title="@string/home"/>

    <item
            android:id="@+id/navigation_artists"
            android:icon="@drawable/ic_action_settings"
            android:title="@string/settings"/>

</menu>
Setting the Activity class
Now we are going to setup NavigationView and NavigationItemSelectedListener .
package com.kotlincodes.bottomnavigationview

import android.support.v7.app.AppCompatActivity
import android.os.Bundle
import android.support.v4.app.Fragment
import kotlinx.android.synthetic.main.activity_main.*

class MainActivity : AppCompatActivity()  {

    override fun onCreate(savedInstanceState: Bundle?) {
        super.onCreate(savedInstanceState)
        setContentView(R.layout.activity_main)

        title=resources.getString(R.string.favorites)
        loadFragment(FavoriteFragment())

        navigationView.setOnNavigationItemSelectedListener {
            when(it.itemId){
                R.id.navigation_fav-> {
                    title=resources.getString(R.string.favorites)
                    loadFragment(FavoriteFragment())
                    return@setOnNavigationItemSelectedListener true
                }

                R.id.navigation_home-> {
                    title=resources.getString(R.string.home)
                    loadFragment(HomeFragment())
                    return@setOnNavigationItemSelectedListener true
                }

                R.id.navigation_settings-> {
                    title=resources.getString(R.string.settings)
                    loadFragment(SettingsFragment())
                    return@setOnNavigationItemSelectedListener true
                }

            }
            false

        }
    }

    private fun loadFragment(fragment: Fragment) {
        // load fragment
        val transaction = supportFragmentManager.beginTransaction()
        transaction.replace(R.id.container, fragment)
        transaction.addToBackStack(null)
        transaction.commit()
    }
}
Here we are not using the findViewById method to bind the views, we are just using synthetic binding extensions from Kotlin by importing the following
import kotlinx.android.synthetic.main.activity_main.*We’ll start with the FavoriteFragment.kt class and you should follow a similar process for the remaining two fragment classes—HomeFragment.kt and SettingsFragment.kt.
The fragment added here is the basic one just uses one TextView, you can replace it with any Fragment.
FavoriteFragment.kt
package com.kotlincodes.bottomnavigationview

import android.os.Bundle
import android.support.v4.app.Fragment
import android.view.LayoutInflater
import android.view.View
import android.view.ViewGroup

class FavoriteFragment : Fragment(){
    override fun onCreateView(inflater: LayoutInflater, container: ViewGroup?, savedInstanceState: Bundle?): View? {
        return inflater.inflate(R.layout.fragment_fav,container,false)

    }
}
fragmet_fav.xml
<?xml version="1.0" encoding="utf-8"?>
<RelativeLayout
        xmlns:android="http://schemas.android.com/apk/res/android"
        android:layout_width="match_parent"
        android:layout_height="match_parent">

    <TextView android:layout_width="match_parent"
              android:layout_centerInParent="true"
              android:textAlignment="center"
              android:textSize="18sp"
              android:text="@string/favorites"
              android:layout_height="wrap_content"/>
</RelativeLayout>
That’s it! Now run the project! The full source code is available here.
Thanks for reading!
